
AI Thematic Analysis: Top Tools & How It Works
[vc_row type=”in_container” full_screen_row_position=”middle” column_margin=”default” column_direction=”default” column_direction_tablet=”default” column_direction_phone=”default” scene_position=”center” text_color=”dark” text_align=”left” row_border_radius=”none” row_border_radius_applies=”bg” overflow=”visible” overlay_strength=”0.3″ gradient_direction=”left_to_right” shape_divider_position=”bottom” bg_image_animation=”none”][vc_column column_padding=”no-extra-padding” column_padding_tablet=”inherit” column_padding_phone=”inherit” column_padding_position=”all” column_element_direction_desktop=”default” column_element_spacing=”default” desktop_text_alignment=”default” tablet_text_alignment=”default” phone_text_alignment=”default” background_color_opacity=”1″ background_hover_color_opacity=”1″ column_backdrop_filter=”none” column_shadow=”none” column_border_radius=”none” column_link_target=”_self” column_position=”default” gradient_direction=”left_to_right” overlay_strength=”0.3″ width=”1/1″ tablet_width_inherit=”default” animation_type=”default” bg_image_animation=”none” border_type=”simple” column_border_width=”none” column_border_style=”solid”][vc_column_text]Thematic analysis has become an essential method for uncovering patterns and insights in qualitative data. In a world where information is generated at an unprecedented rate, relying on manual methods for thematic analysis is no longer sufficient. Enter AI-powered thematic analysis—a game-changing approach that leverages artificial intelligence to revolutionize the way researchers analyze qualitative data. Thematic analysis plays a crucial role in qualitative research by allowing researchers to identify, analyze, and report patterns or themes within data. This method provides a structured approach to organizing data and drawing meaningful insights from qualitative datasets, which can be particularly dense and complex. This article explores the growing relevance of AI thematic analysis in today’s data-driven landscape. It delves into how AI addresses traditional challenges like time consumption and bias, providing scalable and accurate solutions. Additionally, we’ll review the top AI tools for thematic analysis, showcasing their unique features and how it all works. By the end, you’ll understand how AI enhances the thematic analysis process and how to select the best tools for your needs. Why AI Thematic Analysis Matters The evolution of thematic analysis has been marked by a shift from manual methods to technology-driven solutions. While traditional methods rely on meticulous manual coding and subjective interpretation, they often fall short in terms of scalability and objectivity. Imagine sifting through countless pages of text trying to find patterns, themes, and insights. The task can be overwhelming and time-consuming. This is where thematic analysis tools come in, revolutionizing the way we analyze qualitative data by automating and streamlining the process. Employing thematic analysis tools can significantly streamline the analytical process, making it easier to manage large sets of data and ensuring consistency in theme identification. These tools not only enhance the efficiency but also improve the accuracy of the analysis, providing a robust foundation for drawing meaningful conclusions and contributing to the reliability and validity of the research outcomes. Having the right tools can transform the thematic analysis from a daunting task into a more manageable and insightful endeavor. Thematic Analysis: Traditional vs AI Tools AI significantly enhances thematic analysis by automating labor-intensive tasks and improving accuracy. Traditional thematic analysis often involves manually sifting through vast datasets, which can be both time-consuming and prone to human error. With AI tools, researchers can quickly identify patterns, trends, and common themes within large volumes of qualitative data. Moreover, AI algorithms can provide deeper insights by using advanced techniques like natural language processing and machine learning. These tools analyze not just the surface-level data but uncover nuanced relationships and hidden themes that might be overlooked by human analysts. Consequently, AI not only streamlines the process but also augments the depth and quality of the thematic analysis, making it immensely valuable for researchers and analysts alike. 5 Best Thematic Analysis AI Tools Thematic analysis tools are designed to help researchers and analysts categorize and interpret large amounts of textual data more efficiently. These AI-driven tools can identify recurring themes, provide visualizations, and offer insights that are often missed through manual analysis. With the right tools, thematic analysis becomes not just manageable, but also remarkably insightful. Selecting the right AI tools for thematic analysis can alleviate the complexities of data analysis, enabling you to focus more on extracting meaningful insights. These tools offer a combination of efficiency, depth, and user-friendly experiences that are essential for successful thematic analysis. Let’s explore the top five AI tools that can assist you in transforming raw data into coherent themes and insights 1. Insight7 – End-to-End AI Thematic Analysis Tool Insight7 is an AI-powered platform designed specifically for qualitative thematic analysis. It stands out as an all-in-one solution, offering tools that simplify the process of transcribing, analyzing, and reporting on unstructured data from interviews, focus groups, and customer feedback. Insight7 begins with uploading of transcripts & text documents or high-accuracy transcription for audio and video files. The platform then uses advanced AI algorithms to identify recurring themes, sentiments, and insights in the data. These insights are presented in clear, visually appealing formats, including charts and reports, making it easy for teams to understand the findings and take action. Key Features Automated Qualitative Thematic Analysis: Insight7 uses sophisticated AI algorithms to process large datasets and identify themes, sentiments, trends, and recurring patterns in qualitative data. By automating manual coding processes, it reduces the time required for analysis while eliminating subjective biases. This feature ensures that researchers can focus on interpreting results and applying insights to strategic decision-making. Bulk Transcription Capability: The platform supports the bulk upload of audio and video recordings, allowing researchers to transcribe multiple files simultaneously. Its AI transcription system generates accurate, time-stamped transcripts in multiple languages, making it ideal for multinational or large-scale studies. This feature streamlines the workflow for teams dealing with extensive qualitative datasets. Generate Visualizations & Reports: Insight7 empowers users to tailor their reports and deliverables based on project requirements. Whether you need Journey maps, Segmentation diagrams, or other data visualizations, the platform provides tools to create deliverables that are visually engaging and actionable. Export options include PDF and PowerPoint, ensuring compatibility with diverse presentation formats. Enterprise-Grade Data Security: Data privacy and compliance are fundamental to Insight7’s design. The platform employs end-to-end encryption to safeguard sensitive data and adheres to international standards like GDPR, SOC2 and HIPAA. This ensures that businesses can work with confidence, knowing their qualitative data is secure and handled with the utmost care. Project-Based Research Repository: Insight7 offers a project-centric approach to research management, enabling users to organize their data into separate, easily accessible repositories. This feature is particularly useful for managing multi-phase studies or long-term projects, ensuring all relevant data and insights are consolidated in a single, structured location. Collaboration and Sharing: The platform fosters teamwork by providing tools
AI-Powered Cold Calling for Businesses
Sales trainers and enablement managers running cold calling programs face a consistent problem: live cold call practice requires real prospects, real stakes, and real consequences for getting it wrong. AI cold calling training removes that constraint by giving sales reps a realistic practice environment where they can fail, learn, and retry before their first live dial. This guide covers how AI training for cold calling works, which tools provide it, and how to build a practice program that transfers to real call performance. How AI Cold Calling Training Works AI cold calling training uses voice-based roleplay bots that simulate prospect behavior: answering the phone, pushing back on the opener, giving objections, asking for more information, or hanging up. The rep practices the full cold call arc, from introduction through objection handling to next-step ask, against a persona that responds dynamically to what they say. After the session, the platform scores the call against defined criteria: opener effectiveness, value proposition clarity, objection handling, pacing, and closing behavior. The rep can retake the scenario immediately and see whether their score improved. Insight7 takes this further by generating roleplay scenarios from your own sales call library. Instead of practicing against a generic "skeptical buyer" persona, reps practice against scenarios built from the hardest cold calls your team has actually faced, including the exact objection patterns and resistance types your prospects use. Is there an AI to practice cold calling? Yes. Several platforms offer AI cold call practice. Hyperbound is purpose-built for sales roleplay with configurable prospect personas. ColdCALR focuses specifically on cold call training with scored sessions. Insight7 builds scenarios from your real call recordings, which produces more realistic practice than generic prospect bots. The key difference is whether the AI persona is generic or derived from your actual prospect base. What are the 3 C's of cold calling? The 3 C's framework covers the three skill areas that determine cold call success: Confidence (tonality, pacing, and authority in the opener), Clarity (concise value proposition delivered in under 15 seconds), and Curiosity (asking a discovery question that makes the prospect want to continue). AI training platforms score reps on all three after each session, giving them a quantified gap to work on rather than general feedback like "be more confident." Steps for Building an AI Cold Calling Training Program Step 1: Define your scoring criteria before running any sessions. Training without a defined scorecard produces uneven results. Before deploying AI cold call practice, write out what good looks like on each criterion. For an opener: good = rep introduces themselves, names the company, and delivers a one-sentence value hook in under 10 seconds; poor = rep introduces themselves and immediately asks "is now a good time?" Common mistake: skipping this step and letting the AI platform define quality for you. Generic scoring criteria do not align with your specific buyer profile or sales motion. Step 2: Build scenarios from your hardest real calls. Generic scenarios train reps for generic situations. The scenarios that produce the fastest improvement are built from your own call library: the prospect who says "we already have a vendor," the one who says "call me back in Q4," the one who asks "how is this different from [competitor]?" Insight7 generates training scenarios directly from call recordings. Upload the 10 hardest cold call transcripts from the last quarter, configure the persona, and assign the scenarios to new reps before their first live call. Step 3: Set a passing threshold for each scenario before assigning it. A rep who scores 65% on their first attempt should not be considered ready to dial. Define the threshold before the session: this rep must score 75 or above on the opener criterion and 70 or above on objection handling before moving to live calls. ATD research on deliberate practice shows that learners who practice with defined pass thresholds improve 40% faster than those who complete sessions without a standard. Without a threshold, reps stop improving once they get a "passing feel" rather than a measurable score. Step 4: Track retake scores to confirm improvement is real. One good session means nothing. A rep who scores 80 once and 55 twice has not mastered the scenario. Track scores across attempts to see whether improvement is trending upward, plateauing, or reverting. Insight7 tracks retake scores per scenario, showing the rep's trajectory from first attempt to passing score. If a rep plateaus after five attempts, the scenario difficulty or the scoring criteria may need adjustment. Step 5: Validate training on live calls within 30 days. AI roleplay scores tell you the rep can perform in a practice environment. Live call scores tell you whether it transferred. Pull criterion-level scores from live cold calls in the 30 days after training completion. Compare the trained criteria (opener, objection handling) against baseline scores from the 30 days before training. A 10-point or greater improvement that holds for two weeks confirms the training worked. If scores did not move, the scenario did not match the real prospect environment closely enough and needs revision. ICMI benchmarks recommend validating all training against live performance within 30 days. If/Then Decision Framework If new reps have never cold called before → then start with generic scenario practice covering opener, objection handling, and next-step ask before moving to real calls. If experienced reps are losing calls at the objection stage → then build scenarios specifically from the five most common objection types in your lost call data. If team performance varies widely with no clear pattern → then run call analysis across 100% of calls to surface which behaviors separate top performers from the rest. If reps practice but live scores do not improve → then the practice scenarios are not realistic enough and need to be rebuilt from real call transcripts. AI Cold Calling Training Tools Tool Best Suited For Scenario Source Hyperbound SDR and AE cold call practice Configurable generic personas ColdCALR Cold call-specific scenario training Template-based scenarios Brevity Pitch Pitch training and
Cold Calling Sales: How AI is Changing the Game
Sales managers and L&D teams building cold calling training programs face a consistent gap: reps complete script training but still struggle on live calls because they have never practiced the specific failure points they will encounter. AI training tools close that gap by giving reps unlimited practice against realistic buyer personas before they attempt those conversations on real prospects. This guide covers how to use AI to improve cold calling effectiveness through structured, data-informed training design. Why traditional cold calling training underperforms Most cold calling training programs follow a pattern: classroom instruction on technique, a script review session, and then live calls. The gap is practice under realistic conditions. Script review does not prepare reps for the buyer who says "not interested" at the 8-second mark, the gatekeeper who asks detailed qualification questions, or the prospect who is interested but cagey. Only practice against realistic scenarios builds the response fluency that turns training into behavior. AI training tools close this gap by providing unlimited practice sessions against AI-simulated buyer personas, available on demand, without requiring a manager to roleplay against the rep. What AI training tools improve in cold calling The behaviors that most reliably improve with AI-assisted practice: Opening sequence delivery: Reps who practice opening lines 20 or more times develop delivery confidence that reduces vocal hesitation, one of the top triggers for early hang-up Objection response speed: The pause between an objection and a response signals uncertainty to buyers. Practicing objection responses against AI personas builds faster, more fluent response patterns Early disengagement recovery: "I'm not interested" in the first 15 seconds is not necessarily disqualifying. Reps who have practiced recovery responses handle it differently than reps who have not Discovery question sequencing: Getting past the gatekeeping phase into a real conversation requires questions that open up dialogue rather than close it down. Practice sessions calibrate this sequence Step 1: Map your common cold call failure modes to practice scenarios Before selecting AI training tools or designing practice sessions, analyze your existing call data: At what point in the call do most early hang-ups occur? (Opening, value statement, qualification?) Which objections appear most frequently in calls that do not advance? What does your top performer do differently in the first 90 seconds compared to average reps? Insight7's call analytics platform processes 100% of cold call recordings and surfaces these patterns: average talk time before disengage, objection frequency distribution, and the specific conversation behaviors that appear in calls that advance to qualified conversations. This data turns training design from assumption-based to evidence-based. Step 2: Build practice scenarios from your actual call patterns Generic AI roleplay scenarios practice generic conversations. The highest-value cold call practice scenarios replicate the specific situations your reps encounter: Your actual buyer personas: job titles, industries, company sizes, typical objections in your market Your actual opening sequences: practice variations on your proven opening frameworks Your actual objection language: use the objection phrases that appear most frequently in your call recordings, not generic objection categories Insight7's coaching module generates practice scenarios from real call recordings. If your data shows that "we already have a solution" appears in 35% of early disengagements, that objection becomes a specific practice scenario, with the exact language your prospects use, not a generic objection-handling drill. Step 3: Use AI roleplay for opening sequence calibration The opening sequence is where most cold calls fail. Reps who do not have a confident, clear opening, one they have delivered dozens of times, stumble in the moment where buyer attention is most fragile. Effective opening sequence practice with AI tools: Record the opening sequence the rep intends to use Practice it against 5 AI buyer variations: distracted buyer, engaged buyer, skeptical buyer, gatekeeping buyer, buyer who is technically available but cognitively absent Review AI feedback on delivery metrics: pacing, vocal confidence, filler word frequency Iterate until delivery is consistent across all buyer variations AI roleplay platforms like Hyperbound and Second Nature offer persona-based cold call practice. Insight7 builds personas from your actual call library, matching the specific buyer dynamics your reps encounter. Step 4: Track practice repetitions and QA score improvement together Practice repetition count tells you how much reps trained. QA score improvement on cold call criteria tells you whether training changed performance. Track both: Practice session completion (minimum target: 3 to 5 repetitions per objection type) QA score on cold call criteria before the training program QA score at 30 and 60 days post-training If practice is occurring but QA scores are not improving, the practice content does not match the failure mode. Return to the call data analysis and adjust the scenario design. Step 5: Build a continuous improvement loop from call data Cold calling effectiveness improves continuously when the training program is connected to live call performance data. The loop: Analyze current cold calls for failure modes Build practice scenarios targeting those specific failure modes Measure whether QA scores on cold call criteria improve after practice Repeat with updated call data Insight7 runs this loop automatically: new call data surfaces new patterns, QA scores track behavior change, and coaching assignments update based on current performance data rather than last quarter's training calendar. What makes AI cold calling practice more effective than manager roleplay? Availability and volume. A rep can run 20 AI practice sessions in the time it takes to schedule one manager roleplay session. For skills that improve through repetition, particularly objection response fluency and opening delivery confidence, volume of practice matters more than the quality of any single session. AI personas also do not provide social encouragement that inflates rep confidence, which means the feedback is calibrated to actual performance. Research from the Association for Talent Development shows that spaced practice across multiple short sessions produces stronger skill retention than single intensive sessions. How do you measure whether AI cold calling training actually worked? Track QA scores on specific cold call criteria before and after the training program, not just completion rates. The metrics that matter: objection response time
How to convert video file to text recording to text
Video Transcription is a transformative process that converts spoken words in video files into written text. This practice allows businesses to analyze content for valuable insights, identifying pain points, desires, and behaviors within customer interactions. It employs AI technology to accurately transcribe and structure conversations, making it possible to search and extract thematic data. For professionals seeking to better understand their clientele or improve content accessibility, mastering video transcription is essential. It stands as a critical tool for content organization and data synthesis in todays digital workplace. Unveiling the simplicity of transforming video content into accessible and editable text. The task of transforming video content into text is far simpler than it might initially appear. By utilizing video transcription tools, individuals and businesses can make their multimedia content readily accessible and editable. This enhances the versatility of the content for things like content marketing and insight analysis. Firstly, to get started, choose a transcription tool – insight7.io for instance, offers an intuitive platform to upload your video files directly from your computer or cloud storage. Once uploaded, the automatic transcription process begins, converting your spoken words into written form with impressive accuracy. After the transcription is complete, the resulting text document is ready for you to review and edit. Additionally, these tools often include features like theme identification and insight extraction, pinpointing key points such as customer pain points, desires, and behaviors within the text. This allows for deeper content analysis and is particularly useful for marketers and researchers who wish to gain a comprehensive understanding of their audience. With just one click, an insights dashboard can be generated, providing a visual representation of core themes that emerged from the transcription. Video transcription not only simplifies the conversion of video to text but also unlocks a wealth of data-driven opportunities for engaging with and understanding your target audience. Essential Steps for Video Transcription For those aiming to enhance their business or work efficiency, converting video files to text is becoming increasingly vital. The first essential step in video transcription includes selecting an appropriate transcription tool. An example of such a tool is insight7.io, known for its ability to transcribe accurately and generate valuable insights from your videos. Once you choose your tool, upload your video file directly from your computer or via cloud storage like Google Drive. After uploading, the transcription process begins, converting spoken words into written text. Its crucial to review the transcript for accuracy and edit any discrepancies to ensure the text accurately reflects the content of the video. This review phase is where expertise plays a significant role. Finally, organize the transcribed text into your project folder, allowing for easy access to analyze data and extract themes like pain points, desires, and user behaviors. Remember, a reliable transcription not only saves time but can unlock deeper understanding and streamline workflows. Choosing the Right Video Transcription Method When embarking on video transcription, selecting the appropriate method is crucial for efficiency and accuracy. Your transcription approach should align with your specific needs, whether thats capturing nuanced customer insights or condensing information into actionable data points. Here are key things to consider: Manual vs. Automated Transcription: Decide between a human transcribers meticulous attention or the speed of automated software. While manual transcription can offer a higher level of accuracy, especially in recognizing context and speaker idiosyncrasies, it is typically more time-consuming and costly. Automated transcription services, on the other hand, provide quick turnarounds, often at a lower cost, but may require additional editing for accuracy. Software Tools: There are various software options available for automated video transcription. Prominent tools include: Rev: Known for high quality with the option of human reviewers. Otter.ai: Combines automatic transcription with AI-powered insights. Sonix: Offers transcription with a focus on searchability within transcripts. Trint: Integrates AI-driven transcription services with editing tools. Customization: For more specialized needs such as identifying particular insights like pain points, desires, and behaviors, opt for services that allow customization. These services should enable you to configure the transcription to highlight or extract specific information relevant to your project. By considering these key points, you can choose a transcription method that best suits your projects requirements, helping you sift through content effectively to extract the necessary insights and evidence from your video files. Remember that regardless of the choice made, evaluating the outcome for clarity and context is always vital. Explore the various techniques to transcribe your video recordings efficiently. When looking to transcribe video recordings efficiently, considering the available techniques enhances productivity and quality. Automated transcription services, like insight7.io, utilize advanced speech recognition technology to convert audio into text swiftly. These AI-driven platforms can not only transcribe but also distinguish between speakers and even detect specific language elements, such as pain points and behaviors, within the conversations. For those seeking nuanced control over their transcripts or dealing with highly technical material, manual transcription might be necessary. Direct transcription ensures accuracy where automatic services may falter, especially when content contains industry-specific jargon. Regardless of the method chosen, the key to efficient video transcription lies in the balance between speed, cost, and the level of detail required. Centralizing the transcribed content in a library system and analyzing it for insights, as done in structured projects, further streamlines the workflow and provides valuable context. Executing the Video to Text Conversion Process Executing the video to text conversion process is critical for businesses to enhance accessibility, and content repurposing, and gain valuable insights from video recordings. Below are key steps to ensure an effective transcription: File Upload: Begin by importing the video files directly from your computer or Google Drive into the project library of the transcription tool. Transcription: Use a reliable video transcription service, such as insight7.io, to convert your video into a readable text transcript. This step is indispensable for analyzing and repurposing your content. Analysis: Once your video is transcribed, you can analyze the text to identify pain points, desires, and customer behaviors. This helps to extract actionable insights for
How to convert audio file to text recording to text
Audio transcription presents a fundamental solution for converting spoken language into written format, offering vast applications in business and professional work. It enables the efficient analysis of interviews, meetings, and customer interactions by transforming audio files into texts. This process captures essential details, such as pain points, desires, and behaviors, allowing for a deeper understanding and insight extraction. Through transcription, participants may better synthesize information, facilitating data-driven decisions that align closely with customer needs and organizational goals. Methods to Convert Audio File to Text When looking to convert audio files to text, several reliable methods can prove beneficial in enhancing the productivity and efficiency of your work. Automated audio transcription services stand out due to their speed and ease of use. Heres a concise list of noteworthy tools: Speech-to-Text Software: This technology employs advanced algorithms to interpret and transcribe spoken words into written text. Examples include Googles Speech-to-Text, IBM Watson Speech to Text, and Amazon Transcribe. Users simply upload their audio files, and the AI-powered software generates a corresponding text transcript. Manual Transcription Services: For those requiring high accuracy and detail, professional transcriptionists provide manual services that can handle complex audio with multiple speakers or background noise. Integrated Platform Solutions: Tools like Nook or NOS ai offer a more holistic approach, where apart from converting audio to text, they provide additional features such as analytics and insights into the transcribed content. When employing these methods, consider the context of use. For businesses and work environments, prioritizing accuracy and the potential to handle large volumes of audio files in bulk is crucial. Transcription services may also offer capabilities to clean up transcripts from formats such as HTML, ensuring only the relevant text is retained. Opt for a service that aligns with your specific needs, whether it may be real-time transcription or post-event transcription of recorded audio. Manual Transcription vs. Automated Transcription When deciding between manual and automated transcription services, its essential to consider accuracy, turnaround time, and cost-effectiveness for your audio transcription needs. Manual transcription involves a person listening to the audio file and typing out the content word-for-word. This method can be highly accurate if done by a skilled transcriber but usually comes with a higher cost and longer processing time. On the other hand, automated transcription utilizes advanced algorithms and speech recognition technology to convert speech into text rapidly. While this can be more cost-effective and provide faster results, it may not always match the precision of a human transcriber, especially with complex audio files that contain technical language, multiple speakers, or background noise. For businesses seeking insights from their audio recordings, consider the following transcription tools: OpenAIs GPT models offer robust automated capabilities for understanding and transcribing speech, making them suitable for generating quick transcripts. Google Cloud speech-to-text services are known for their advanced AI processing, supporting various languages and accents. AWS provides cloud-based automated transcription solutions, often used for large-scale and time-sensitive projects. Proprietary technology can tailor the transcription process to suit specific business needs, configuration for extracting key points, and providing context within the transcript. Choosing the right approach – manual, automated, or a combination of both, will depend on your transcription accuracy requirements and how critical it is to analyze the resulting text for actionable business insights. Best Practices in Audio Transcription When embarking on audio transcription, its essential to prioritize accuracy and clarity in the output text. Begin by ensuring your recordings are of high quality, with minimal background noise and clear, audible speech. If possible, use noise-cancellation tools or software to filter out any distracting sounds. Its also helpful to familiarize yourself with the subject matter to anticipate terminology and context, which can greatly enhance the transcription precision. For a seamless transcription process, its beneficial to leverage reliable transcription software or services. Notable tools include: Dragon NaturallySpeaking: Exceptionally accurate speech recognition for individual users. Google Speech-to-Text: Offers powerful real-time transcription capabilities using Googles advanced AI. Rev: Provides professional transcription services with a quick turnaround. Otter.ai: Ideal for collaborative work with its in-built AI for live transcription and note-taking. By utilizing these tools, you can convert audio files into text more efficiently. However, remember to review and edit the resulting transcriptions. Even with advanced technology, manual verification ensures the highest level of accuracy and captures the nuances of speech that AI might miss. Lastly, secure storage and organization, whether in a project management system or a dedicated library space, allow for easy retrieval and cross-referencing of transcribed materials for further insights and analysis. Tools for Converting Audio Recordings to Text When it comes to converting audio files to text, there are a number of efficient tools that offer solutions to streamline this process. Heres a quick rundown of the top software tools that can significantly aid in audio transcription, tailored for the convenience of businesses of all sizes. Speech-to-Text Services: These are online platforms like Google Speech-to-Text and IBM Watson that use advanced AI to convert spoken words into written text. Theyre ideal for handling large volumes of audio data with high accuracy. Transcription Software: Tools such as Otter.ai and Transcribe provide user-friendly interfaces and features, including automatic transcriptions, editing capabilities, and integrations with popular services, such as video conferencing apps. Desktop Software: For those who prefer offline tools, software like Dragon NaturallySpeaking offers powerful dictation and transcription capabilities directly on your computer without the need for an internet connection. Specialized Services: Services designed for specific fields, such as Rev for legal or medical transcriptions, ensure that terminology and context are accurately captured, a crucial aspect for specialized industries. For businesses looking for a seamless integration with their existing workflows, many of these tools offer APIs and plug-ins that synchronize with commonly used business applications. Whether youre dealing with customer service calls, interviews, or company meetings, utilizing these transcription tools can save time and provide valuable textual insights. Top AI Tools for Audio to Text Conversion In the bustling world of business, the ability to convert audio recordings into textual transcripts swiftly and
Transcribing interviews with Google Docs
Voice Typing Transcription simplifies the task of converting interviews into readable text, offering professionals the ability to effortlessly transcribe recordings directly within Google Docs. As the need to analyze conversations grows, particularly for those in content marketing and data analysis, the ability to accurately capture spoken words is invaluable. This introduction guides you through harnessing Google Docs for transcribing interviews, providing a streamlined method to import, transcribe, and analyze spoken content, and transforming it into actionable insights without cumbersome processes. Learn how to enhance your workflow and enrich your projects by utilizing the convenience of Voice Typing Transcription. The Essentials of Voice Typing Transcription in Google Docs Voice typing transcription in Google Docs has become a game-changer for businesses and professionals aiming to streamline their workflows and accurately document interviews. As a starting point, ensure you have a reliable microphone setup and a quiet environment to minimize errors during transcription. Then, familiarize yourself with the voice typing feature available in Google Docs, which allows for real-time speech-to-text conversion as you conduct your interviews. When transcribing, clarity and context are paramount. Remember to speak distinctly, and consider pausing slightly between sentences to give the transcription service a moment to catch up. To enhance accuracy, periodically review the transcribed text and make necessary corrections. Its important to note that while Google Docs provides a solid foundation for transcription, it may not capture every nuance, especially in technical discussions or interviews with multiple speakers. For more advanced needs or when confidentiality is a concern, third-party tools like insight7.io offer specialized services that may provide higher accuracy and additional features. Whichever tool you choose, make certain it aligns with your objectives, and dont overlook the importance of reviewing the transcript for errors or omissions. Effective transcription not only saves time but also ensures that the insights from your interviews are preserved and can be leveraged for further analysis and decision-making. Setting Up Your Device for Voice Typing Transcription Before diving into the transcription of your interviews with Google Docs, preparing your device for the voice typing transcription feature is essential for a seamless experience. First, ensure your microphone is set up and functioning correctly – this is the primary tool Google Docs will use to capture your voice. Next, check your internet connection stability, as voice typing transcription requires an online connection to Googles servers. The third step involves opening a Google Docs document and enabling the voice typing feature from the Tools menu. Finally, familiarize yourself with the voice commands that control punctuation and formatting to maximize efficiency as you transcribe. During the transcription process, it’s crucial to speak clearly and at a moderate pace. Background noise can interfere with the accuracy of voice typing transcription, so selecting a quiet environment is advisable. Remember also to periodically save your document to avoid data loss. Google Docs allows the option to upload and transcribe audio from videos. If you have pre-recorded interviews, simply import these files into your Google Docs project folder and let the software analyze and transcribe the spoken content into text, ready for your assessment and utilization. Practical Tips for Effective Voice Typing To harness the power of voice typing transcription for transcribing interviews in Google Docs, begin by ensuring a quiet environment to minimize errors in transcription. Position your microphone close enough to capture clear audio, as this will significantly improve the accuracy of the transcription. Before starting, its worthwhile to do a quick test to check that Google Docs is correctly registering your voice and punctuation commands. When youre ready to proceed with voice typing transcription, remember to speak clearly and at a moderate pace. Articulate your words and pause naturally at commas and full stops to aid in the correct formatting of the transcript. If mistakes do occur, make use of Google Docs easy editing tools to make corrections as you go. Additionally, tools like insight7.io offer enhanced features for diving into the transcribed data, allowing you to analyze themes, pain points, and behaviors within the text, streamlining the process of extracting valuable insights from your interviews. By adopting these practices, you can improve the efficiency and accuracy of voice-typed transcripts, making it an invaluable asset for any business or work-related activities. Optimizing Interviews with Google Docs Transcription To enhance the productivity and accuracy of your interview process, integrating Google Docs Voice Typing Transcription is a pragmatic approach. Firstly, ensure that your recording environment is quiet and that your microphone is properly set up to capture clear audio. This minimizes errors and omissions in the transcription. During the transcription, use the speaker identification feature selectively to distinguish between different speakers, ensuring that the conversation is accurately captured and attributed. Periodically review and correct any discrepancies in the transcription to maintain the integrity of the data. Keep focused on structuring content that is clear, concise, and valuable to the people relying on the insights derived from these interviews. It’s essential to understand that Google Docs transcription isnt foolproof. For critical interviews, consider a follow-up with professional transcription services to ensure high-quality, verbatim records. Acknowledge the limitations of automated systems, and use manual verification for complex terminology or sections with overlapping dialogue. This meticulous approach will not only save time in the long run but also contribute to more reliable, insightful data for your business. Overcoming Common Transcription Challenges in Interviews Overcoming the hurdles of transcribing interviews involves understanding the nuances of human conversation and adapting to the varied quality of audio recordings. The interview setting, whether offline or digital, can impact the transcription process significantly. In offline scenarios, the presence of note-takers may reduce the need for transcription, while digital interviews, especially across different time zones, might necessitate a more detailed transcript to ensure that no critical information is lost. To address these challenges, consider the following strategies: Utilize Noise-Cancelling Tools: Background noise can severely affect transcription accuracy. Employing noise-cancelling software helps in isolating the speakers voices and enhancing the clarity of the audio. Choose Advanced Transcription Services:
Transcribe mp3 file to text with Microsoft word
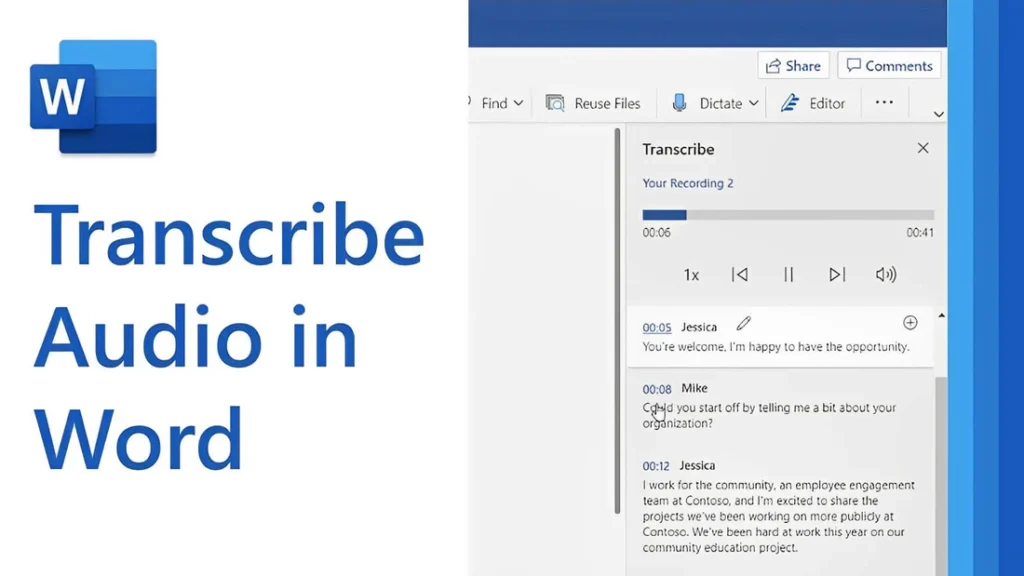
[vc_row type=”in_container” full_screen_row_position=”middle” column_margin=”default” column_direction=”default” column_direction_tablet=”default” column_direction_phone=”default” scene_position=”center” text_color=”dark” text_align=”left” row_border_radius=”none” row_border_radius_applies=”bg” overflow=”visible” overlay_strength=”0.3″ gradient_direction=”left_to_right” shape_divider_position=”bottom” bg_image_animation=”none”][vc_column column_padding=”no-extra-padding” column_padding_tablet=”inherit” column_padding_phone=”inherit” column_padding_position=”all” column_element_direction_desktop=”default” column_element_spacing=”default” desktop_text_alignment=”default” tablet_text_alignment=”default” phone_text_alignment=”default” background_color_opacity=”1″ background_hover_color_opacity=”1″ column_backdrop_filter=”none” column_shadow=”none” column_border_radius=”none” column_link_target=”_self” column_position=”default” gradient_direction=”left_to_right” overlay_strength=”0.3″ width=”1/1″ tablet_width_inherit=”default” animation_type=”default” bg_image_animation=”none” border_type=”simple” column_border_width=”none” column_border_style=”solid”][vc_column_text]Transcribing MP3 files into text is becoming increasingly essential in today’s data-driven world. Whether you’re a researcher, journalist, or business professional, converting audio recordings into text enables easy analysis, efficient documentation, and accurate reporting. While many tools exist, using Microsoft Word offers a simple, cost-effective solution for transcription. In this guide, you’ll learn how to transcribe MP3 files into text using Microsoft Word seamlessly. By the end, you’ll understand the tools required, how to avoid common transcription pitfalls, and how to get the most out of this technology for qualitative research. Understanding the Basics Before proceeding with the steps, let’s explore some foundational concepts about transcription and how Microsoft Word contributes to the process. What Is Transcription? Transcription is converting spoken words in audio or video files into written text. For qualitative researchers, transcription is crucial in analyzing interviews, focus groups, or customer calls. Accurate transcriptions provide a foundation for insights and reports. Understanding Audio Transcription in Microsoft Word Audio transcription in Microsoft Word is a feature that converts spoken words in audio files into written text. This capability is especially useful for businesses and professionals who efficiently document interactions, interviews, and meetings. Audio Transcription in Microsoft Word is revolutionizing how we convert spoken dialogue into written text. This feature allows users, such as team leads and researchers, to document and analyze interviews efficiently for actionable insights. With just a few clicks, users can upload their MP3 files into Word and witness the conversion process unfold. This powerful tool reveals not only verbatim text but also identifies speakers and key themes, such as pain points and behaviors. It is integral for those aiming to streamline their workflow and derive meaningful conclusions from their audio content, making it an invaluable asset in business and work environments. Using AI technology, Microsoft Word can identify speakers and provide a transcript that captures the nuances of conversations, enabling users to analyze and derive insights quickly. Read: Transcript Analysis AI: How It Works How Microsoft Word Transcription Works Microsoft Word now integrates with Microsoft 365’s Dictate Feature, which allows users to transcribe audio files. This feature supports MP3, WAV, and other popular formats and converts audio into editable text within minutes. To get started with audio transcription, first upload your MP3 files into the Word document library. Once uploaded, you can initiate the transcription process, during which the application will analyze the audio. The result is an editable transcript that users can review for accuracy. This transcript allows for extracting key points, such as customer pain points, desires, and behaviors—a crucial step for businesses aiming to understand their audience better. Furthermore, the functionality to add custom insights, like customer compliments, makes the transcription service adaptable to specific business needs. Preparing Your MP3 Files for Transcription Before diving into audio transcription with Microsoft Word, ensuring your MP3 files are primed and ready is crucial. Generally, files should be clear of background noise and have distinguishable speakers for the best results. Here’s a straightforward approach to preparing your recordings: Quality Check: Listen to your MP3 files. Confirm clarity and volume levels are adequate throughout the recording. If necessary, use an audio editing tool to enhance the sound quality. Unnecessarily loud sections or background buzz can hinder transcription accuracy. Format Verification: Microsoft Word supports certain audio formats for transcription. Ensure your MP3 files conform to these specifications to avoid compatibility issues during uploading. Shorten Lengths: If you have particularly long audio files, consider breaking them into shorter segments. This not only facilitates easier handling and management but can also help Microsoft Word’s transcription service process the audio more efficiently, especially if you’re dealing with limited internet bandwidth or processing power. Organize Content: For a streamlined transcription process, organize your MP3 files logically. If you’re working on several interviews or calls, label them appropriately and arrange them in the order they’ll be transcribed. This saves time and confusion later on. By preparing your MP3 files attentively, you can maximize the potential of your audio transcription efforts and gain valuable insights from your conversations. Clean and well-organized audio files are foundational for reliable transcription output, whether for business analysis or project management. Key Features of Microsoft Word’s Transcription Tool Microsoft Word’s transcription tool elevates the ease and efficiency of audio transcription, streamlining the process for businesses and professionals alike. This tool’s standout feature is its ability to distinguish between different speakers, which is highly beneficial for accurately transcribing meetings and interviews. This identification assists users in tracking the flow of conversation and attributing statements to the correct individuals, a critical aspect for clarity and organization of transcribed texts. Additionally, the transcription tool incorporates analysis capabilities, extracting key insights such as pain points, desires, and behaviors from the transcribed text. This aids in quickly identifying important themes and facilitating a deeper understanding of customer interactions or team communications. By using AI, the tool can pinpoint and extract relevant quotes as evidence of these insights, providing users with rich, contextual data for more informed decision-making. The seamless integration of transcription and analysis within Microsoft Word empowers users to unlock actionable insights from their audio files with minimal effort. How to Transcribe MP3 File to Text Using Microsoft Word If you want to convert your MP3 files into text, Microsoft Word offers a straightforward solution for audio transcription. Successfully transcribing MP3 files into text using Microsoft Word requires a clear understanding of the steps involved. Here’s how to transcribe your recordings directly within Word: Open Microsoft Word on your computer and locate the “Dictate” button, which includes the Transcribe option. Select Transcribe and then Upload the audio. Choose the MP3 file you wish to transcribe from your device. Once uploaded, Word will begin transcribing the audio file automatically. Depending on the file’s length,
Transcribe mp3 file to text with Google Drive
[vc_row type=”in_container” full_screen_row_position=”middle” column_margin=”default” column_direction=”default” column_direction_tablet=”default” column_direction_phone=”default” scene_position=”center” text_color=”dark” text_align=”left” row_border_radius=”none” row_border_radius_applies=”bg” overflow=”visible” overlay_strength=”0.3″ gradient_direction=”left_to_right” shape_divider_position=”bottom” bg_image_animation=”none”][vc_column column_padding=”no-extra-padding” column_padding_tablet=”inherit” column_padding_phone=”inherit” column_padding_position=”all” column_element_direction_desktop=”default” column_element_spacing=”default” desktop_text_alignment=”default” tablet_text_alignment=”default” phone_text_alignment=”default” background_color_opacity=”1″ background_hover_color_opacity=”1″ column_backdrop_filter=”none” column_shadow=”none” column_border_radius=”none” column_link_target=”_self” column_position=”default” gradient_direction=”left_to_right” overlay_strength=”0.3″ width=”1/1″ tablet_width_inherit=”default” animation_type=”default” bg_image_animation=”none” border_type=”simple” column_border_width=”none” column_border_style=”solid”][vc_column_text] Audio transcription tools have become invaluable for professionals looking to convert spoken words into written text. Whether you’re conducting interviews, analyzing customer calls, or collecting qualitative data, transcription transforms raw audio recordings into actionable insights. Some wonder “Can you use Google to transcribe audio files to text?” Yes you can. Although Google Drive does not have a built-in audio transcription feature, it offers several workarounds through integrations with tools like Insight7, Google Docs, Marketplace add-ons, etc. These solutions enable you to transcribe MP3 files into text, providing accessibility, analysis, and strategic decision-making opportunities. Understanding how to leverage these tools can be a game-changer for professionals aiming to refine their content strategies, derive insights from their transcripts or enhance market research efforts. Tools to Transcribe Audio (mp3) File to Text with Google Google provides several methods to transcribe audio content, often requiring creativity and the use of additional tools: Insight7: This is an AI-driven platform that integrates effortlessly with Google Drive. Insight7 offers not only transcription capabilities but also advanced analysis, making it a go-to tool for businesses that need to extract actionable insights from their video and audio content. Google Docs Voice Typing: This provides a practical workaround for those looking for a simple transcription method. By playing the audio file aloud, Google Docs’ Voice Typing converts the speech into text in real-time. This method is ideal for straightforward use cases with clear audio, though it may require manual editing to improve accuracy. Google Marketplace Add-Ons: Add-ons such as Transcripto and TranscribeKit can be integrated with Google Drive for smooth transcription processes. They’re particularly useful for teams that frequently handle audio files and need a reliable transcription tool directly in Google Docs. Google Cloud Speech-to-Text API: For more technically inclined users, Google’s API can be employed alongside a Python script to deliver precise audio transcription. Although it requires some coding knowledge, the results can be highly customizable and scalable. By utilizing these tools, you can ensure that the essential details from customer interactions, meetings, or interviews are not lost but preserved and easily accessible for future analysis. Steps for Transcribing MP3 Files Using Google Tools Here’s how to use Google tools and integrations effectively for MP3 transcription: 1. Prepare Your MP3 File for Transcription Before diving into transcription, ensure your MP3 file is in optimal condition. The quality of the audio file directly influences the accuracy of the transcription. Steps to Enhance Audio Quality: Minimize Background Noise: Record in a quiet setting or use noise-reduction software such as Audacity or Adobe Audition. Adjust Microphone Levels: Perform a sound check to avoid distortion and ensure clarity. Amplify Audio: Use tools like Audacity to enhance voice clarity. Test Transcription: Conduct a brief test transcription to gauge audio quality. By following these steps, you can improve transcription accuracy, ensuring the text reflects the audio content accurately. 2. Upload Your MP3 File to Google Drive Uploading your MP3 file to Google Drive is a necessary step before using Google tools for transcription. This centralization makes integration with add-ons and APIs seamless. Steps to Upload Audio: Navigate to Google Drive and click the New button in the top left corner. Select File upload or Folder upload if you’re managing multiple files. Choose the MP3 file from your local drive, and it will start uploading to your Drive. Organize your audio files within My Drive or specific folders and share them with your team if needed. 3. Transcribe mp3 to text: Which Tools Should I Use? Here are the tools to use to transcribe Google audio files to text: a) Use AI Tools like Insight7 While Google tools provide a basic starting point, platforms like Insight7 offer advanced transcription and analysis capabilities. Key Benefits of Insight7: Seamless Integration: Insight7 effortlessly integrates with Google Drive and other major platforms, allowing you to streamline your workflow without any disruptions. Advanced Analytics: Unlock deeper insights into customer interactions and market trends, going beyond basic transcription to uncover actionable data that drives better decisions. User-Friendly Interface: With an intuitive design, Insight7 makes transcription and analysis processes simple and efficient, even for users with minimal technical expertise. Free to Start: Begin exploring Insight7’s powerful features without any upfront cost, offering a low-risk way to enhance your transcription and analysis capabilities. High-Level Accuracy and Multi-Language Support: Insight7 provides precise transcriptions in over 100 languages, making it ideal for global teams working with diverse video content. Automatic Speaker Recognition and Timestamps: Insight7 automatically identifies speakers and adds timestamps, making it easy to follow conversations and highlight key moments. Comprehensive File Format Support: Compatible with MP3, WAV, MP4, and MOV, Insight7 simplifies transcription across various media formats. Custom Export Options: Effortlessly export transcriptions for team sharing, perfect for content creation and collaboration. Beyond transcription, Insight7 offers a comprehensive suite for analyzing video content. From highlighting key themes and extracting actionable insights to categorizing feedback and trends, it’s more than just a transcription tool – it’s a complete solution for decision-making and strategy building b) Google Docs Voice Typing You can use Google Docs to convert voice to text with Google Docs’ Voice Typing. It serves as a practical workaround for simple transcriptions. How to Use Google Docs Voice Typing: Open Google Docs and create a new document. Click on Tools > Voice Typing. A microphone icon will appear. Play your audio file aloud in a quiet environment. Click the microphone icon on Google Docs to start transcribing. The spoken words will be converted into text in real-time. This method is best for audio files with clear sound and minimal background noise. It offers a quick way to convert audio to text but may require manual editing for accuracy. c) Explore Google Marketplace Add-Ons For those seeking a more automated approach, Google Marketplace offers
Transcribe Audio File to Text with Microsoft Teams
[vc_row type=”in_container” full_screen_row_position=”middle” column_margin=”default” column_direction=”default” column_direction_tablet=”default” column_direction_phone=”default” scene_position=”center” text_color=”dark” text_align=”left” row_border_radius=”none” row_border_radius_applies=”bg” overflow=”visible” overlay_strength=”0.3″ gradient_direction=”left_to_right” shape_divider_position=”bottom” bg_image_animation=”none”][vc_column column_padding=”no-extra-padding” column_padding_tablet=”inherit” column_padding_phone=”inherit” column_padding_position=”all” column_element_direction_desktop=”default” column_element_spacing=”default” desktop_text_alignment=”default” tablet_text_alignment=”default” phone_text_alignment=”default” background_color_opacity=”1″ background_hover_color_opacity=”1″ column_backdrop_filter=”none” column_shadow=”none” column_border_radius=”none” column_link_target=”_self” column_position=”default” gradient_direction=”left_to_right” overlay_strength=”0.3″ width=”1/1″ tablet_width_inherit=”default” animation_type=”default” bg_image_animation=”none” border_type=”simple” column_border_width=”none” column_border_style=”solid”][vc_column_text] In a world increasingly reliant on virtual communication, the ability to transcribe audio files to text has become a game-changer. Whether for meetings, lectures, interviews, or team collaborations, transcription allows for accurate record-keeping and simplifies analyzing spoken content. Teams Transcription offers a robust solution for converting your Microsoft Teams audio files into written text, enabling easy analysis for actionable insights. Ideal for businesses seeking to understand customer needs and behaviors, this service automatically identifies speakers and extracts key points, such as pain points, desires, and behaviors from conversations. With the added ability to customize data extraction, your team can gain a comprehensive understanding of client interactions quickly and accurately. Teams Transcription is an indispensable tool for anyone who needs to streamline their workflow and enhance their data analysis capabilities. This guide will walk you through how to transcribe audio files to text using Microsoft Teams, highlighting its transcription capabilities, common challenges, and best practices. By the end of this article, you’ll be equipped to make the most of Teams’ AI-powered tools to boost your productivity and enhance team collaboration. Can Microsoft Teams Transcribe Audio? Yes, Microsoft Teams has transcription features designed to convert meeting audio into text automatically. This capability is part of its AI-powered toolkit, making transcription quick and accurate. However, these features are primarily available for live meetings and recordings. How Does Transcription Work in Teams? Microsoft Teams uses AI to process audio data and generate text transcriptions. Once enabled during a meeting, the platform captures audio in real time and automatically creates a text transcript. These transcripts can be accessed and shared after the meeting, making reviewing discussions or sharing summaries easier. How to Use Teams Transcription to Convert Audio Files to Text To effectively utilize Teams Transcription, first ensure that your audio files are uploaded into the app’s library section. This is where all your data—including videos and documents—is stored after upload. Once in the library, the transcription service converts your audio content into written text. This function is particularly seamless with Teams calls, enabling effortless identification of speakers and the subsequent transcription of their dialogue. After transcription, you can extract meaningful insights from the text. The default settings allow you to identify key points such as pain points, desires, and behaviors from customer interactions, which are essential for gaining customer insights. However, the system also offers customization options, allowing you to highlight additional data points such as compliments or other customer requests. Teams Transcription enables you to pull direct quotes from the transcript for each insight, providing valuable context to the identified points. Furthermore, all services are cloud-based, ensuring accessibility and secure data storage. Steps to Transcribe an Audio File in Microsoft Teams For businesses and professionals looking to optimize their workflow, transcribing audio files into text is a game-changer. Microsoft Teams offers a transcription feature that simplifies this process. Here are the necessary steps: Step 1: Enable Transcription for Your Microsoft Teams Account Before transcribing audio files, ensure transcription is enabled in your Teams settings. Key Actions: Check Admin Settings: Only administrators can enable transcription for the entire organization. Ask your IT admin to turn on the “Allow Transcription” setting in the Teams admin center. Enable Live Captions: Navigate to the meeting options in Teams and ensure live captions are turned on. Transcription relies on this feature. Verify Recording Permissions: Confirm that your account has permission to record meetings, as transcription is linked to recordings. Common Mistake to Avoid: Not checking admin permissions in advance, which can delay transcription availability. Step 2: Record the Audio in a Teams Meeting Transcription in Teams is most effective when paired with recorded meetings. Key Actions: Start the Meeting: Begin a meeting in Teams as usual. Start Recording: Click the three-dot menu (…) and select “Start Recording.” This activates both the recording and transcription features. Enable Live Transcription: Click the three-dot menu again and select “Start Transcription.” Pro Tip: Inform participants that the meeting is being recorded and transcribed for transparency and compliance. Step 3: Access the Transcription After the Meeting Once the meeting ends, Teams automatically saves the transcript alongside the recording. Key Actions: Locate the Transcript: Go to Teams’s meeting chat or recording link. The transcript is saved under the “Recordings & Transcripts” tab. Download the Transcript: Click on the transcript and select “Download” to save it as a text file or Word document. Edit for Accuracy: Review the downloaded transcript for any inaccuracies or formatting issues, especially if multiple speakers were involved. Pro Tip: Use the time-stamped transcript to locate specific sections of the recording quickly. Step 4: Transcribe Pre-Recorded Audio Files If you need to transcribe an audio file outside of a Teams meeting, use a workaround since Teams doesn’t directly support file uploads for transcription. Key Actions: Play the Audio File During a Meeting: Start a Teams meeting and share your system audio while playing the file. Enable Recording and Transcription: Follow the steps in Step 2 to record and transcribe the audio. Common Mistake to Avoid: Forgetting to optimize audio quality, which can lead to inaccurate transcriptions. Step 5: Share and Utilize the Transcript Once your transcript is ready, share it with your team or use it for further analysis. Key Actions: Share via Teams: Upload the transcript to the meeting chat or a shared channel for easy access. Analyze with Insight7: Use Insight7 to extract key themes and actionable insights from the transcript. Incorporate Findings: Summarize the transcript’s key points in presentations, reports, or meeting follow-ups. With these steps, leveraging Teams Transcription goes beyond mere text conversion; it enables users to extract key points that may help make data-driven decisions. Remember to regularly save your work and review the transcription for accuracy, ensuring the final text serves its
Transcribe video file to text with Google Docs
[vc_row type=”in_container” full_screen_row_position=”middle” column_margin=”default” column_direction=”default” column_direction_tablet=”default” column_direction_phone=”default” scene_position=”center” text_color=”dark” text_align=”left” row_border_radius=”none” row_border_radius_applies=”bg” overflow=”visible” overlay_strength=”0.3″ gradient_direction=”left_to_right” shape_divider_position=”bottom” bg_image_animation=”none”][vc_column column_padding=”no-extra-padding” column_padding_tablet=”inherit” column_padding_phone=”inherit” column_padding_position=”all” column_element_direction_desktop=”default” column_element_spacing=”default” desktop_text_alignment=”default” tablet_text_alignment=”default” phone_text_alignment=”default” background_color_opacity=”1″ background_hover_color_opacity=”1″ column_backdrop_filter=”none” column_shadow=”none” column_border_radius=”none” column_link_target=”_self” column_position=”default” gradient_direction=”left_to_right” overlay_strength=”0.3″ width=”1/1″ tablet_width_inherit=”default” animation_type=”default” bg_image_animation=”none” border_type=”simple” column_border_width=”none” column_border_style=”solid”][vc_column_text]In the age of digital transformation, videos are a dominant medium for communication, learning, and research. Video Transcription with Google Docs is a pivotal tool for professionals seeking efficient ways to convert video content into textual form. From interviews to webinars, video files often contain valuable information that needs to be converted into text for easier analysis, sharing, and documentation. It serves as a bridge, enabling users to upload video files directly from their computers or Google Drive and swiftly transcribe them into text. Whether for capturing crucial points discussed in a meeting, analyzing interview data, or enhancing content marketing strategies, the transcription feature within Docs streamlines the process. It saves time and allows easy integration of transcripts into project folders for subsequent analysis. By unlocking the potential of Video Transcription in Docs, businesses, and individuals can easily accelerate their workflow and derive actionable insights from their video files. In this guide, we’ll explain how to use Google Docs to transcribe video files to text, explain the benefits and limitations of this method, and discuss how advanced tools like Insight7 can enhance your transcription and qualitative analysis processes. By the end of this guide, you will: Understand how Google Docs Voice Typing works for video transcription. Learn step-by-step how to transcribe a video file to text. Discover how Insight7 can complement transcription workflows by turning raw transcripts into actionable insights. Understanding Video Transcription with Google Docs What Is Video Transcription? Video transcription involves converting spoken words from a video file into a written format. It’s widely used for creating subtitles, extracting insights from interviews, and documenting video content for reference or analysis. Why Use Google Docs for Video Transcription? Google Docs offers a built-in Voice Typing feature that uses speech recognition technology to capture spoken words and convert them into text. Although not specifically designed for transcription, this feature can transcribe audio from a video file played through your device’s speakers. How Does It Work? The Voice Typing tool listens to audio through your device’s microphone and transcribes it in real time. By playing the video near the microphone, the tool converts the spoken content into text within Google Docs. Limitations of Google Docs for Transcription While Google Docs Voice Typing is free and easy to use, it does have limitations: Audio Quality Dependency: Clear audio is essential for accurate transcription. Limited Features: Unlike professional transcription tools, it lacks advanced capabilities such as speaker identification or automated punctuation. Manual Editing Required: You’ll need to review and correct the text for accuracy. Read: Transcribe mp3 file to text with Microsoft word Steps to Transcribe Video Files to Text with Google Docs A streamlined process ensures efficiency and accuracy when transcribing video files to text using Google Docs. Begin by uploading your video into a transcription tool such as Insight7.io, which can automatically convert speech into a written transcript. After the transcription is complete, you can import this text directly into Google Docs for further editing and refinement. Google Docs’ Voice Typing feature offers an accessible way to transcribe video files into text. Follow these steps to complete the process effectively: Step 1: Set Up Your Workspace Before you start, create an ideal environment for transcription. Quiet Environment: Ensure there is minimal background noise to avoid interference with the transcription. Functional Microphone: Test your microphone to ensure it captures audio clearly. Tools You’ll Need: A computer or laptop. A video file you want to transcribe. Import your video file into a transcription service from your computer or Google Drive. Access to Google Docs via a browser (preferably Chrome for optimal performance). Step 2: Enable Voice Typing in Google Docs Open Google Docs and create a new blank document. Navigate to the Tools menu at the top of the screen and select Voice Typing from the dropdown. A microphone icon will appear on the left-hand side of your screen. Pro Tip: Ensure you have a stable internet connection, as Google Docs relies on cloud processing for voice recognition. Step 3: Play Your Video File Now, it’s time to prepare your video file for transcription. Open the video file on your computer using your preferred video player. Position your device’s microphone close to the speakers to capture audio effectively. Set the video volume to a moderate level to ensure clarity. Step 4: Start Transcribing Click the microphone icon in Google Docs to activate Voice Typing. Press play on your video file and allow the audio to play naturally. Watch as Google Docs begins transcribing the audio into text in real time. Common Tip: Pause the video periodically to make corrections or ensure the transcription is capturing the content accurately. Step 5: Edit and Save Your Transcript Once the video is fully transcribed: Pause the transcription by clicking the microphone icon again. Carefully review the document to fix any errors, punctuation issues, or formatting inconsistencies. Save your transcript to Google Drive or download it in your preferred format (e.g., Word or PDF). Optional Step: Route Audio Internally for Higher Accuracy If you want to improve transcription accuracy and bypass ambient noise: Use tools like VB-Audio Cable or Soundflower to route audio directly from your video player to Google Docs. These tools eliminate background noise by feeding the audio directly to the transcription software. Through this technique, you can harness AI-based transcription services to streamline the conversion of video content into text, optimizing for both time and effort. Whether for content marketing or data analysis, this transcription process allows for more accessible data extraction and deeper insights into customer behaviors, desires, and pain points. By integrating these steps, businesses can enhance their content strategy and capitalize on the rich information embedded in their video files. Read: Transcribe audio file to text with Google Docs